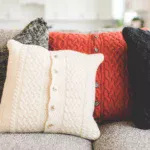
Knitting your own pillow covers is a fun and creative way to add a personal touch to your home décor. Whether you’re a beginner or an experienced knitter, this knitted pillow covers tutorial will guide you through the process of crafting beautiful, custom-made pillow covers. Not only do knitted pillow covers offer comfort and style, but they also allow you to experiment with different textures, colors, and patterns to match your living space perfectly.
In this tutorial, we will cover all the essential steps, from selecting the right yarn and needles to finishing your pillow covers with a professional look. With detailed instructions and helpful tips, you’ll be well on your way to creating something unique for your home.
Why Knit Your Own Pillow Covers?
Knitting your own pillow covers allows for complete customization. You can match them to your existing décor, choose your favorite colors, and even create a range of seasonal designs. This knitted pillow covers tutorial will help you understand how to craft pillow covers that fit perfectly and complement any room in your house.
Not only does knitting your own covers provide a personal touch, but it’s also a sustainable choice. Instead of buying new home décor, you can repurpose old yarn, reduce waste, and create something that lasts for years.
Materials You’ll Need
Before diving into the knitted pillow covers tutorial, ensure you have the following materials on hand:
1. Yarn:
Select a durable yarn that’s soft and comfortable. Cotton or wool blends work well for pillow covers. Choose a color that complements your home décor.
2. Knitting Needles:
Use needles that match the weight of your yarn. Typically, 4mm to 6mm needles work well for most types of yarn suitable for pillow covers.
3. Pillow Insert:
You’ll need a pillow insert to determine the size of your cover. Standard sizes are 16×16 inches or 18×18 inches, but you can adjust the pattern to fit any size.
4. Scissors and Darning Needle:
Scissors are necessary for trimming yarn, while a darning needle will help you weave in loose ends and seam the edges.
5. Measuring Tape:
Use a measuring tape to ensure that your knitted fabric matches the dimensions of the pillow insert.
Choosing the Right Pattern
Selecting the right pattern is key to the success of your project. In this knitted pillow covers tutorial, we’ll start with simple patterns that are perfect for beginners but offer enough creativity for more experienced knitters as well.
Garter Stitch Pillow Cover
A garter stitch is one of the simplest knitting patterns, making it ideal for beginners. The texture it creates is simple yet classic and looks great in any living room. To knit a garter stitch pillow cover, knit every row, making sure to keep an even tension throughout.
Cable Knit Pillow Cover
For those looking for something more intricate, a cable knit pattern adds sophistication and texture to your pillow covers. Cable knitting requires some experience, but with practice, you can create beautiful, durable covers that will last.

Step-by-Step Knitted Pillow Covers Tutorial
Step 1: Cast On Stitches
Start by casting on stitches that match the width of your pillow insert. For a standard 16×16-inch pillow, you will need around 80 stitches using medium-weight yarn and 5mm needles. Adjust the number of stitches based on the size of your pillow insert and the thickness of your yarn.
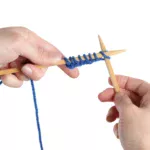
Step 2: Begin Knitting
Knit the first row using your chosen pattern. If you are following the garter stitch pattern, knit every stitch across the row. For cable patterns, follow the cable instructions carefully, as they may require the use of a cable needle.
Step 3: Continue Knitting Until Desired Length
Knit until the length of your fabric matches the height of your pillow insert. For a 16×16-inch pillow, you’ll need approximately 32 rows for garter stitch. Be sure to measure as you go to avoid making the cover too short or too long.
Step 4: Bind Off
Once your fabric reaches the desired length, bind off your stitches. This will secure your work and prepare it for assembly.
Step 5: Sewing the Edges
Fold your knitted fabric in half, ensuring the right sides are facing in. Use a darning needle to sew three sides of the cover, leaving one side open for inserting the pillow. You can use a simple whip stitch or mattress stitch for a seamless finish.
Step 6: Insert the Pillow and Close
After sewing three sides, turn the cover right side out, insert the pillow, and sew the remaining side closed. You can add buttons or a zipper for easy removal if desired.
Common Mistakes and How to Avoid Them
Even experienced knitters can encounter challenges during the knitting process. Here are some common mistakes and solutions to ensure your pillow cover turns out perfectly:
Uneven Tension
Tension is key to achieving a smooth, uniform look. Make sure your stitches aren’t too tight or too loose. If you notice your knitting is becoming uneven, take a break and relax your hands before continuing.
Incorrect Gauge
Gauge refers to the number of stitches per inch. If your gauge doesn’t match the pattern, your cover may not fit the pillow insert correctly. To avoid this, knit a gauge swatch before starting your project and adjust your needle size if necessary.
Finishing Issues
Proper finishing is crucial for a professional-looking pillow cover. Be sure to sew the edges securely and weave in all loose ends.
Real-World Example: Crafting the Perfect Pillow Cover
Let’s look at a real-world example. Jane, an intermediate knitter, wanted to create a set of pillow covers for her living room. She followed this knitted pillow covers tutorial using a cable knit pattern. After selecting a soft wool blend and using 6mm needles, Jane completed her project in just a few days. The result? A beautiful set of matching pillow covers that added texture and warmth to her living space. By using her skills and this guide, Jane was able to create something both functional and stylish.
FAQ: Frequently Asked Questions About Knitted Pillow Covers
A: The time it takes to knit a pillow cover depends on your experience and the complexity of the pattern. For a simple garter stitch cover, you can expect to finish in 3-5 hours.
A: Cotton, wool, or acrylic yarns are ideal for pillow covers because they are durable and easy to care for. Wool adds warmth, while cotton is breathable.
A: Yes! This knitted pillow covers tutorial is beginner-friendly, with options like the garter stitch pattern that are easy to follow.
Key Takeaways
- Materials: Yarn, needles, pillow insert, darning needle, and scissors are essential for this project.
- Pattern Options: Garter stitch is great for beginners, while cable knitting offers a more advanced option.
- Process: Start by casting on, knitting the desired length, binding off, and sewing the edges.
- Common Mistakes: Watch for uneven tension and incorrect gauge to ensure your pillow cover fits perfectly.
Read More: How to Knit a Cozy Throw Blanket for Your Living Room
External Resources for Further Learning
- Craftsy – Tutorials and patterns for all levels.
- KnitPicks – Supplies and tools for knitting enthusiasts.
- Ravelry – A community platform for sharing knitting patterns and ideas.
By following this knitted pillow covers tutorial, you can craft beautiful, custom pillow covers that enhance your home décor. Whether you’re a beginner or a seasoned knitter, this step-by-step guide will help you create something truly special. Happy knitting!